Imagine gathering with loved ones, the irresistible aroma of sizzling meat filling the air, and laughter echoing around a tabletop grill. This is the essence of Yakiniku, Japan’s beloved grilled meat experience. While often enjoyed in bustling restaurants, bringing this authentic Japanese BBQ into your own home is not only possible but incredibly rewarding. With thinly sliced, flavorful meats, vibrant vegetables, and delectable dipping sauces, Yakiniku offers a hands-on culinary adventure that’s both simple to prepare and wonderfully interactive. This guide will walk you through everything you need to know to create an unforgettable Yakiniku feast right in your kitchen or backyard.
What Exactly is Yakiniku? A Japanese Culinary Tradition
“Yakiniku” literally translates to “grilled meat,” embodying a distinct style of Japanese barbecue that has captured hearts worldwide. While influenced by Korean BBQ in its early days, Yakiniku evolved into its own unique tradition, focusing on cooking small, bite-sized pieces of meat and vegetables over a direct flame or hot plate, often at the table. The beauty of Yakiniku lies in its communal aspect and the fresh, un-marinated quality of many of its meats, allowing the natural flavors to shine.
Unlike heavily pre-marinated Korean BBQ, Yakiniku typically features lightly seasoned or plain cuts of meat that diners dip into a variety of flavorful sauces, known as tare, after grilling. This allows for an exploration of different taste profiles with each succulent bite, creating a truly customizable and engaging dining experience. It’s not just a meal; it’s an event that brings people together over delicious food.
Choosing Your Cuts: The Best Meats for Yakiniku
The foundation of any great Yakiniku meal is high-quality, perfectly prepared meat. The key is to select cuts that are tender and can be sliced very thinly, allowing for quick cooking and maximum flavor absorption. While beef is the star, other meats and seafood also make excellent additions to the grill.
Popular Beef Cuts
- Karubi (Short Ribs): This is arguably the most popular Yakiniku cut. Known for its rich marbling and juicy tenderness, karubi offers a deep, satisfying beef flavor. It grills beautifully, achieving crispy edges while remaining incredibly succulent.
- Harami (Skirt Steak): Coming from the diaphragm area, harami is a flavorful cut with a robust, meaty taste and a tender texture. It’s often seasoned with miso or soy sauce to enhance its bold profile.
- Ro-su (Loin/Sirloin): A leaner option, ro-su provides a balanced mix of meat and subtle fat. It’s tender and a great choice for those who prefer less fatty cuts, often enjoyed simply with salt or wasabi.
- Gyutan (Beef Tongue): Thinly sliced beef tongue offers a unique, slightly chewy texture and a mild, distinctive flavor. It’s typically grilled lightly and served with a squeeze of lemon and a sprinkle of salt.
- Misuji (Chuck Flap/Top Blade): A rarer cut from the shoulder blade area, misuji boasts fine marbling that melts in your mouth, delivering a rich and tender experience.
|
Our Picks for the Best electric grill in 2026
As an Amazon Associate I earn from qualifying purchases.
|
||
| Num | Product | Action |
|---|---|---|
| 1 | Artestia 1800W Electric Outdoor Grills with Lid Indoor Smokeless Grill for Balcony with Temperature Control Portable Removable Stand Grill for Cooking, BBQ Party, Family |

|
| 2 | Hamilton Beach Electric Indoor Searing Grill with Viewing Window & Adjustable Temperature Control to 450F, 118 sq. in. Surface Serves 6, PFAS-Free Removable Nonstick Grate, Stainless Steel |
|
| 3 | Ninja Griddle and Indoor Grill, 14’’, Electric Grill, For Steak, Burgers, Salmon, Veggies, and More, Pancake Griddle, Nonstick, Dishwasher Safe, 500F, Even Cooking, Silver, GR101 |
|
| 4 | Chefman Smokeless Indoor Electric Grill, Extra Large Grilling Surface, Nonstick Table Top Grill for Indoor Grilling and BBQ with Adjustable Temperature Control, Drip Tray, Dishwasher-Safe Parts |
|
| 5 | Ninja DG551 Foodi Smart XL 6-in-1 Indoor Grill with Air Fry, Roast, Bake, Broil, & Dehydrate, Foodi Smart Thermometer, 2nd Generation, Black/Silver |
|
| 6 | Chefman Electric Smokeless Indoor Grill w/ Non-Stick Cooking Surface & Adjustable Temperature Knob from Warm to Sear for Customized BBQing, Dishwasher Safe Removable Water Tray, Black |
|
| 7 | Electric Grill, CUSIMAX Electric Indoor/Outdoor Grill, 1600W Portable BBQ with Lid for Indoor & Outdoor Use, Adjustable Heat, Removable Stand Grill for Cookouts, BBQ Gatherings, Small Spaces |
|
| 8 | Electric Grill, Techwood Indoor/Outdoor Electric BBQ Grill, 1600W Portable Removable Stand Grill with Adjustable Heat & Drip Tray, Double Layer Design for Party, Patio & Backyard (Blue) |
|
| 9 | Electric Grill, Techwood Indoor/Outdoor Electric BBQ Grill, 1600W Portable Removable Stand Grill with Adjustable Heat & Drip Tray, Double Layer Design for Party, Patio & Backyard (Black) |
|
| 10 | Chefman XL Electric Griddle with Removable Temperature Control, Immersible Flat Top Grill, Burger, Eggs, Pancake Griddle, Nonstick Extra Large Cooking Surface, Slide Out Drip Tray, 10 x 20 Inch |
|
Other Meats and Seafood
Don’t limit yourself to just beef! Expand your Yakiniku platter with:
- Pork Belly (Butabara): Thin slices of pork belly become wonderfully crispy and flavorful when grilled.
- Chicken Thigh (Momo): Tender and juicy, chicken thigh slices are delicious, especially with a light marinade.
- Seafood: Shrimp, scallops, and squid rings grill quickly and add a delightful variety to your meal.
The Importance of Thin Slicing
Regardless of the cut, thin slicing is paramount for Yakiniku. Aim for slices roughly 1/8 inch (3-5 mm) thick. This ensures quick cooking and tender results. A pro tip to achieve super thin slices is to partially freeze the meat for 20-30 minutes before slicing against the grain. This firms up the meat, making it easier to cut uniformly.
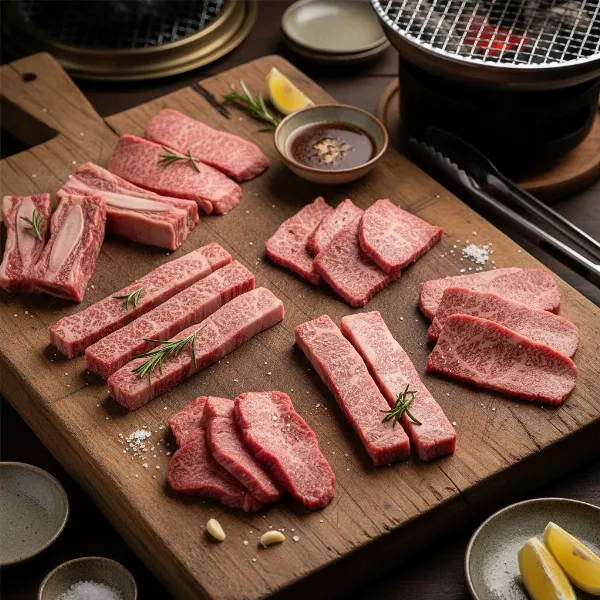 Assortment of thinly sliced beef cuts for Yakiniku, arranged artfully on a wooden board ready for grilling.
Crafting the Perfect Yakiniku Tare (Dipping Sauce)
While the meat is the star, the tare (dipping sauce) is the supporting actor that truly defines the Yakiniku experience. A good homemade tare balances sweet, savory, and umami flavors, enhancing the grilled meat without overpowering it.
Classic Yakiniku Tare Ingredients
A basic, versatile tare typically includes:
- Soy Sauce: The savory base.
- Mirin: Japanese sweet rice wine, adding sweetness and a subtle tang.
- Sake: Japanese rice wine, contributing depth and aroma (optional but recommended).
- Sugar: For sweetness, often brown sugar or granulated sugar.
- Grated Garlic & Ginger: Essential aromatics for pungent depth.
- Sesame Oil: For a nutty, toasted aroma.
- Toasted Sesame Seeds: Adds texture and nutty flavor.
- Optional Enhancements: Grated apple or onion can add natural sweetness and body. A touch of dashi stock can deepen the umami.
Basic Homemade Tare Recipe
Here’s a simple recipe for a delicious Yakiniku tare:
- Combine: In a small saucepan, whisk together 1/4 cup soy sauce, 1/4 cup mirin, 2 tablespoons sake (optional), 2 tablespoons sugar, 1 teaspoon grated garlic, and 1 teaspoon grated ginger.
- Simmer: Heat over medium-low heat, stirring constantly, until the sugar dissolves and the sauce just begins to simmer. Do not boil vigorously.
- Cool & Finish: Remove from heat and let it cool to room temperature. Stir in 1 teaspoon sesame oil and 1 tablespoon toasted sesame seeds.
- Store: Transfer to an airtight container and refrigerate. The flavors will deepen overnight.
Variations to Explore
- Spicy Tare: Add 1/2 teaspoon to 1 tablespoon of gochujang (Korean chili paste) or a pinch of red pepper flakes to the basic tare recipe for a fiery kick.
- Citrusy Tare: A splash of fresh lemon juice or yuzu juice can brighten the sauce, especially for leaner cuts or seafood.
- Umami Boost: A small amount of white miso paste can add a rich, savory complexity.
- Salt & Wasabi: For purists, simply dipping grilled meat in high-quality sea salt (or green tea salt) or a dab of fresh wasabi highlights the meat’s natural taste.
Essential Equipment for a Home Yakiniku Experience
While a dedicated Yakiniku restaurant boasts specialized grills, you can easily replicate the experience at home with various equipment, from traditional to modern and budget-friendly.
Traditional & Outdoor Grills
- Konro / Hibachi Grill: These small, often charcoal-fired grills are traditional for Yakiniku and provide an authentic smoky flavor. Best used outdoors due to charcoal smoke.
- Portable Gas Grill: A small, outdoor gas grill can also be used, offering good heat control.
Indoor Grilling Options
For convenient indoor Yakiniku, several options exist:
- Electric Smokeless Grill: Designed to minimize smoke, these tabletop grills are excellent for apartment living, offering consistent heat and easy cleanup.
- Portable Gas Cassette Grill with Grill Pan: These units use small butane canisters and offer strong heat, allowing for a good sear. Ensure adequate ventilation when using indoors.
- Cast-Iron Grill Pan or Flat-Top Griddle: A heavy-duty cast-iron pan or a flat griddle can achieve a fantastic sear on your meat. Preheat thoroughly on your stove.
- Non-Stick Frying Pan/Wok: The most accessible option, a regular non-stick frying pan or wok can be used for a stir-fry style Yakiniku, especially if you slice your ingredients even smaller. While it won’t give the same “grilled” texture, it’s a delicious alternative.
Regardless of your choice, ensure you have good ventilation when grilling indoors to manage smoke and odors.
Step-by-Step Guide: Grilling Yakiniku Like a Pro
The beauty of Yakiniku lies in its simplicity and the joy of cooking at your own pace. Follow these steps for a perfect home Yakiniku feast.
1. Prepare Your Ingredients
- Slice Meats: Ensure all your chosen meats are sliced uniformly thin (as discussed above). Arrange them neatly on platters.
- Prep Vegetables: Wash and chop your vegetables. Popular choices include:
- Onion: Thick rings or wedges.
- Bell Peppers: Strips of various colors.
- Mushrooms: Shiitake (remove stems, score tops), King Oyster (sliced lengthwise).
- Pumpkin/Kabocha Squash: Thin rounds (pre-microwave for 1-2 minutes to soften for faster grilling).
- Asparagus: Snap off woody ends.
- Arrange vegetables attractively on separate plates.
- Make Your Tare: Prepare your Yakiniku tare and any other dipping sauces, placing them in small individual bowls for each diner.
- Prepare Rice: Cook fluffy Japanese short-grain rice.
2. Set Up Your Grill
- Place your chosen grill in the center of your dining table (if indoor) or a convenient outdoor spot.
- Preheat the grill to a high temperature. Lightly brush the grill surface with a neutral oil (like grapeseed or canola) to prevent sticking.
3. Grilling Techniques
- Cook in Batches: Avoid overcrowding the grill. Cook only a few pieces of meat and vegetables at a time. This keeps the temperature high and ensures a good sear.
- Quick Sear: Yakiniku cooks quickly due to the thin slices. Grill beef for mere seconds per side until it’s beautifully caramelized and cooked to your desired doneness (medium-rare to medium is often preferred for tenderness). Thicker cuts or chicken may take a bit longer.
- Don’t Overcook: The goal is tender, juicy meat. Keep a close eye on your ingredients as they cook.
- Resting Plate: Have a warm plate or bowl ready to transfer cooked items. This helps them retain heat and juices.
4. Serving and Enjoying
Encourage everyone to participate in grilling their own selection. This interactive process is a core part of the Yakiniku fun! Dip the hot, freshly grilled meat and vegetables into the tare or other sauces. Serve immediately with warm rice and side dishes.
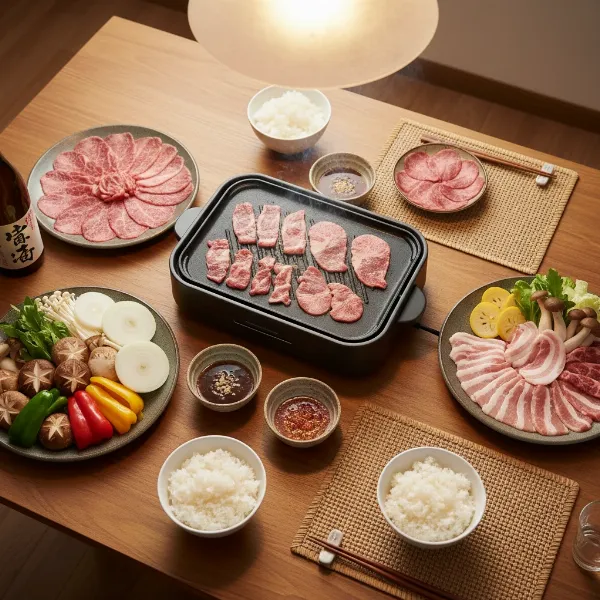 A vibrant home Yakiniku setup with a tabletop grill, platters of raw meat and vegetables, and small bowls of dipping sauces.
Elevating Your Feast: Authentic Yakiniku Side Dishes
No Yakiniku meal is complete without a delicious array of side dishes and accompaniments that complement the rich flavors of the grilled meats.
- Steamed Japanese Rice: This is non-negotiable! Fluffy, sticky Japanese short-grain rice is the perfect neutral canvas to balance the savory, rich flavors of the meat and sauces.
- Fresh Vegetables for Wrapping: Offer crisp lettuce leaves (like butter lettuce or green leaf) and shiso (perilla) leaves for wrapping grilled meat and rice, adding a refreshing crunch and herbaceous note.
- Kimchi and Pickles (Tsukemono): While Yakiniku is Japanese, the Korean influence means kimchi is a popular addition, offering a spicy, fermented counterpoint. Other Japanese pickles (tsukemono) like pickled daikon or cucumber also work well.
- Seasoned Vegetables (Namul-style): Lightly blanched and seasoned spinach or bean sprouts, often found in Korean cuisine, are simple yet delicious additions.
- Simple Salads: A light green salad with a Japanese dressing or a simple cucumber and tomato salad can provide a refreshing contrast.
Tips for an Unforgettable Yakiniku Night
- Embrace the Communal Experience: Yakiniku is meant to be shared. Encourage everyone to cook their own pieces and try different combinations of meat, vegetables, and sauces.
- Don’t Overcook the Meat: The thin slices cook very quickly. Overcooking will make them tough. Aim for tender and juicy results.
- Experiment with Sauces: Offer a variety of dipping sauces so guests can customize their flavors. Don’t be afraid to try combinations like Yakiniku tare with a touch of wasabi.
- Keep Things Warm: Have warm serving plates ready for cooked meat to ensure every bite is enjoyed at its best temperature.
- Prepare Ahead: Do all your slicing and sauce preparation before guests arrive so you can relax and enjoy the grilling.
“The true magic of Yakiniku lies in its interactive nature – it’s a culinary conversation where every bite is a creation.”
Conclusion
Bringing the authentic experience of Yakiniku into your home is an incredibly rewarding culinary journey. From selecting premium, thinly sliced meats to crafting your signature tare dipping sauces and enjoying them hot off the grill with a spread of delicious sides, Yakiniku is more than just a meal; it’s a celebration of flavor, freshness, and togetherness. By following these guidelines, you’re now equipped to host a Japanese BBQ night that will impress your family and friends and leave everyone craving the next sizzling bite. So, fire up your grill, gather your ingredients, and get ready to savor the delightful art of homemade Yakiniku.
What new Yakiniku creations will you discover in your own kitchen?
Frequently Asked Questions
What’s the difference between Yakiniku and Korean BBQ?
While both involve grilling meat at the table, Yakiniku typically features thinly sliced meats that are often un-marinated and dipped in sauce after cooking. Korean BBQ often uses thicker, pre-marinated cuts of meat.
Can I use frozen meat for Yakiniku?
Yes, using partially frozen meat can actually make slicing easier! Freeze a cut of meat overnight, then let it thaw for 20-30 minutes until it’s firm but pliable. This allows for cleaner, very thin slices against the grain.
What vegetables are best for Yakiniku?
Popular choices include onion rings, bell pepper strips, mushrooms (shiitake, king oyster), pumpkin or kabocha squash slices, and asparagus. Leafy greens like lettuce are also excellent for wrapping grilled meat.
How thin should Yakiniku meat be sliced?
For optimal tenderness and quick cooking, aim for very thin slices, generally around 1/8 inch (3-5 millimeters) thick. This ensures a rapid sear and prevents the meat from becoming tough.
Can Yakiniku be made in a regular pan?
Absolutely! If you don’t have a specialized grill, a heavy cast-iron skillet, a flat-top griddle, or even a non-stick frying pan can work well. You’ll essentially be stir-frying the thinly sliced meat and vegetables, achieving similar delicious results.